In this article we will figure out if it is possible to use a portable car jump starter as the welding current supply for the spot welder.
The car jump starter i bought for testing is the “Suaoki U10 Jump Starter” from Amazon.
It is rated at 800A max. current and should have a whopping 20000 mAh capacity. At 12V that would be 240Wh. Seems a bit optimistic. After testing, the real capacity turned out to be 6000 mAh which is about 72Wh at 12V. But we will get to that later in more detail.
What parts do we need
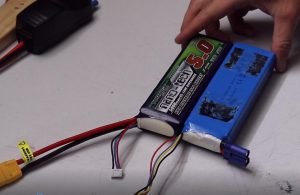
The jump starter comes with a “booster box”, a power supply for charging and the jump starter itself. I cut of the battery clips from the booster output and crimped on some cable shoes to connect it to the spot welder. One positive thing here: The high power connector on the jump starter is an EC5 type. This is a pretty common connector on RC stuff and easy to get on ebay for example.

Connecting it to the Spot Welder
Now it was time to connect it to the Spot Welder. Negative cable to the Spot Welders U-shaped aluminum part and the positive cable to the fuse case. Then the “booster /protection” box is plugged into the jump starter. But even after turning on the jump starter there was no voltage at the spot welder. It turns out the “protection” box monitors the voltage at its output and only turns on if there is 12V attached. After some reading through the manual i found that the output can be forced to be turned on by pushing the little button in the booster box. Problem with this is that the output automatically turns of after 30s again. The spot welder works with it this way but turning it back on every 30s is not practical.


Taking a look inside the booster/protection box
By the shape of the box you could think there are some capacitors inside to help the jump starter deliver the high current peak. So i took it apart to see whats inside. Unfortunately there are no capacitors in there. Just some components for the protective functionality and to control the big relay that switches the output on and off. The relay is rated at 70A which could be a bit low for 800A current output of the jump starter.


Connecting the jump starter directly to the Spot Welder
To connect it directly we either need to bridge the red cable in the protection box or make a little EC5 adapter. I chose to make the EC5 adapter, so i can put the protection box back together and have its original functionality. With the EC5 adapter the Spot Welder can now be directly pluged into the jump starter. And then it turns on as expected and does not turn of on its own. It even stays on if the jump starter is switched off. Another benefit is that we eliminated the additional resistance of the relay in the protection box. That should allow a little bit higher welding current.


Doing test welds
For testing i placed two pieces of 0.15mm nickel strip on top of each other on a piece of wood. This way testing is safe and if something goes wrong you just shoot a hole in the nickel strip. The result is pretty good. Measured weld current is arround 500A. Quite a bit lower than the advertised 800A current, but still strong enough to spot weld. It is also possible that the current gets limited a bit by my EC5 adapter. I had no thicker silicone wire on hand. With thicker wire the resistance may be a bit lower.


Whats inside the jump starter
Now that the welding capability was confirmed i was curious to see whats inside the jump starter. There seem to be many different approches on these devices. I have heard of jump starters that use mosfets or relays to switch the output. But this particular one does not switch the output on the jump starter itself. The EC5 connector is directly connected to a 3s 11,1V Lipo battery. So the “only” safety feature is the relay in the external protection box.
The battery is labeled with 11.1V but no capacity. It is clearly a “normal” Lipo battery. I completely discharged and then charged it with my RC battery charger to find out it has 6000 mAh capacity. The size of the battery is pretty much exactley the same as the 5000mAh Turnigy NanoTech.
Some research in the manual showed that the 6000mAh fit pretty good with the 74Wh capacity on the product parameter page in the manual. I still dont know how they got to the 20000mAh capacity rating, but at least the 74Wh rating is honest.
Other than the battery there are just two pcbs inside the case. One has 3 leds on it that act as a flashlight and the main pcb has the USB and charging connection and the display on it. The battery is charged/balanced/monitored through its balancing connector from the main pcb.


Battery duration test
To see how the jump starter handles many welds in a row i modified the Spot Welder a bit so it automatically activates a pulse every 3 seconds. I then connected both welding tips to a piece of brass rod to simulate the nickel strip. The pulse time was set to 10mS. As you can see the battery temperature rised up pretty high even with the jump starters case open. After about 400 welds it reached arround 50°C celsius. I then gave it a little 5 minute brake and started again. After 800 welds total i stopped the test because the battery temperature reached 60° celsius. This is the maximum working temperature a lipo should be used at. At higher temperatures the internal chemistry of the lipo will start to get damaged which will decrease the lifetime of the lipo. The 800 welds at 10mS pulse time took 3100mAh out of the battery.

Conclusion
All in all the build quality of this jump starter is pretty good. If you are only going to build small batteries with a few hundred (arround 300 – 400) weld spots at a time it is a good alternative. For building big batteries with thousands of welds i would still recommend to use a standard car battery to power the welder.
Pros:
- EC5 connector is directly on the Lipo battery. This way there are no mosfets or relays in the jump starter that could fail.
- USB power bank and the Lipo charger integrated in the jump starter
Cons:
- more expensive than lipo or car Battey (about 25 € for a used car battery vs. 50 € for a Lipo/new car battery vs. 74 € for the jump starter)
- no long term experience yet how well the jump starters battery will handle the high current pulses.
I think they probably got the 20000mah rating by adding the capacity of each single cell. So a slightly optimistic 6670mah @ 3.7v * 3 = 20000mah.
I’ve been using my jump starter powered welder for a few weeks now and it has worked well for the modest battery packs I’ve built. If anyone else plans to use a jump starter though, I would advise the following:
1) Use one that lets you connect directly connection to the battery, these types will have an external protection module like shown here. I burned out the MOSFETs on another one I tried that had internal protection.
2) Check that the connector is something standard like EC5. The one I bought had an unusual connector and I had to fabricate a custom connector to connect to it.
Can you specify the make and model of the spot welder that you used? I would like to get one to try this myself.
Thanks
Its this one: https://malectrics.eu/product/diy-arduino-battery-spot-welder-prebuilt-kit-v3/