In the new V2.2 PCBs the “AutoPulse” feature is integrated, but you can also upgrade your “old” Spot Welder with the new feature pretty easy.
You only need a few parts: (SMD 1206 or wired parts, depending on what you prefer)
- 1x 470 Ohm resistor
- 1x 620 Ohm resistor
- 1x 20 kOhm resistor
- 1x Z-Diode (4,3V 0,5w)
- a piece of thin wire (optional with a connector)
Connect them according to this schematic:
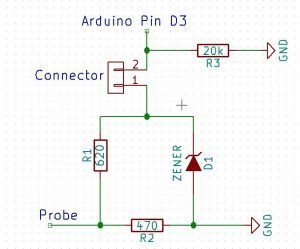
(Probe is the mosfets middle Pin)
Then upload the new V2.2 Arduino Code to your Arduino Nano
While the AutoPulse feature is activated you can not use the normal foot switch to activate a pulse. So it is recommended to make the cable that connects to Pin D3 of the arduino removable with a connector. If you do this you need to install the 20k resistor from Pin D3 to GND to make sure the Arduino reads a solid GND signal if the connector is removed.
Alternatively you could flash the Arduino with V2.1 of the Spot Welder software again to disable the AutoPulse feature. Using this method there is no need for the 20k resisor or to make the cable removable with a connector.
Instructions Video: (20k resitor from Pin D3 to GND is missing in the Video, sorry)
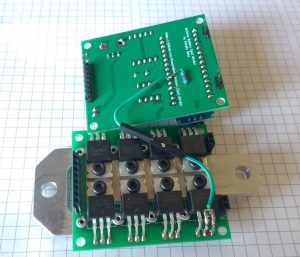
Some pictures how it should look: