This is the Quick Start Guide for the old versions of the Spot Welder (V2.2 or older). For V3 please click here.
Please take a minute to read the safety instructions and the quick start guide. If you encounter any problems or have suggestions for improvements feel free to contact us.
General Information:
- recommended welding battery: car battery 12V 40Ah 440A (or 440CCA)
- Arduino board power: 12V 1A power supply / 3s Lipo/Liion battery
- Welding cable: 16mm², each about 50cm long
- recommended welding material: 0.1mm to 0.15mm nickel strip
Safety Instructions:
Only use this product if you have some basic understanding of electricity. We are dealing with very high currents here which can be dangerous.
The spot welder is capable of up to 650A (V2.2 1000A) welding current for safe operation. Do not use a car battery that can deliver more Amps. For example a 40Ah 440A car battery works fine to weld 0.1mm or 0.15mm nickel strips to batteries.
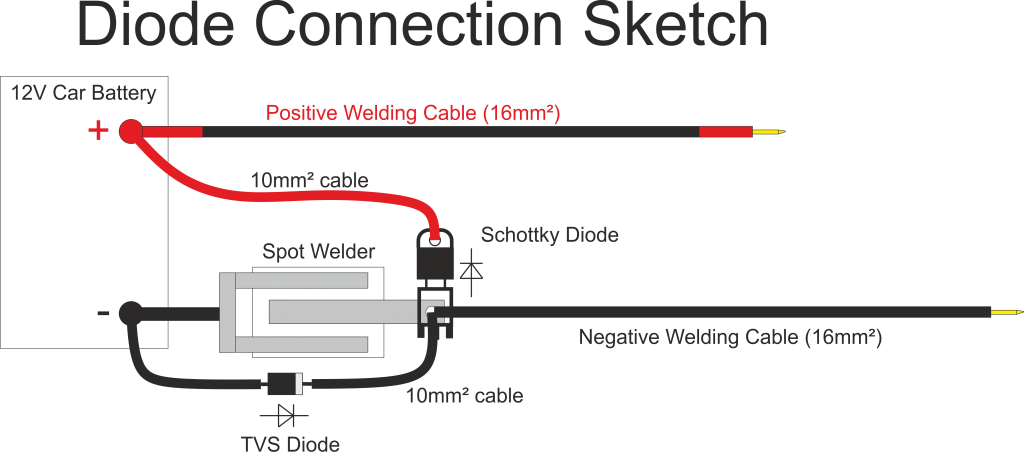
If you want to use higher currents or longer welding cables you can do this at your own risk. Absolute maximum rating is about 1000A welding current. In that case or if the device is used very much we recommend upgrading the spot welder with some protection diodes, like the ones we offer in the Diode Set.
Do not connect it wrong way around to the car battery. The black 16mm² cable with the U-bend which is soldered to welder (or in the new V2 the U-shaped aluminum part) goes to the batteries minus (black) pole.
On the first use set the welding time to 2 or 3ms and see how it welds. Then increase the time until you get good welds. If time is set to high, e.g. 20ms for very thin nickel your nickel material will “explode”.
Optional:
For maximum safety measure the voltage on the two welding tips before every use, to make sure it is around 0V. If it shows 12V (your car batteries voltage) something is shorted out or you got a defective mosfet.
Note: In the new V2.2 you have to remove the “Auto_Pulse” Jumper next to the Arduino before measuring the voltage. Otherwise you will always get arround 12V (your car batterys voltage).
Quick Start:
- Connect the welding cables and the spot welder according to the connection sketch. ( Important: Connect the U-shaped aluminum part to the car battery or lipo minus pole, NOT the straight aluminum part )
- Connect your foot switch to the spot welder
- if you have V2.2 remove the Jumer next to the Arduino when using a foot switch
- Set the welding time with the potentiometer (Display shows 1-90 in milli seconds)
- Now you can start welding

- Optional: Connect the protection diodes